Prepare real campaigns
Use Campaign Studio for source briefs, complete posts, clinical and language checks, calendar planning and connected Facebook delivery. It has no pilot evaluation form.
Open full programLearn why Glossavia was created, follow the everyday workflow and introduce it to your practice one step at a time.
Glossavia is a campaign workspace developed through WOWELINAI (Women Wellness Innovation and AI) CIC. It helps teams turn information they supply into accessible screening posts, keeping the source, languages, images and calendar together.
The project began with a desk-based needs assessment and literature review about breast-screening participation among South Asian women in Croydon. Initial Phase 2 service discussions highlighted practical barriers involving language, digital confidence, caring responsibilities, access and understanding appointment options. Colleagues also described existing translated materials, community work and social media activity.
Glossavia explores one contribution: helping staff adapt current information into clear multilingual content for human review. Early service insights informed the design; they do not establish that Glossavia increases screening attendance. Social media should sit alongside accessible offline and personal support.
Use Campaign Studio for source briefs, complete posts, clinical and language checks, calendar planning and connected Facebook delivery. It has no pilot evaluation form.
Open full programCreate separate test campaigns. Reviewers score posts, record approvals and track language progress in Pilot & evaluation. Pilot posts never publish to Facebook.
See how the pilot worksEuan Chand contributes to this project as a medical student under the supervision of Dr Priya Devadas. Glossavia creates communication drafts; it does not assess symptoms, interpret tests or decide whether someone should be screened.
Choose the Full program or Pilot program on the welcome page, then sign in with your Glossavia email address and password. New users first create a password from their invitation email. Select Your account to see your name, sign-in email, responsibility, assigned languages and programme access. The same source and image workflow is used in both areas. Open a step below for screenshots and numbered instructions.
The screenshots use example data and a simplified demonstration header. In your account, the workspace sections are in the left sidebar. Your role determines which controls you can use.
Your source can be a document about screening. You do not need to write the posts yourself.
1Select your campaign. Use New campaign in the workspace. Give it a useful name, such as “Breast Cancer - South West London - 11/09/2026”. The campaign dropdown also contains edit and delete options; deletion asks for confirmation.
2Add and check the source. Import a PDF, Word, text or Markdown file, or paste the information. Check imported text, add Last reviewed date and Reviewed by, then Save source. In the full program, a clinical reviewer or administrator selects Confirm source checked. In the pilot, that source check is recorded with the clinical post review, so no separate confirmation is needed here. See what to include in your brief.
3Choose languages and batch. English is kept for comparison. The pilot offers 1, 3, 6, 10, 15, 20 or 30 messages per language. Six messages × five languages makes 30 complete posts. Choose the calendar start and select Generate campaign & images.
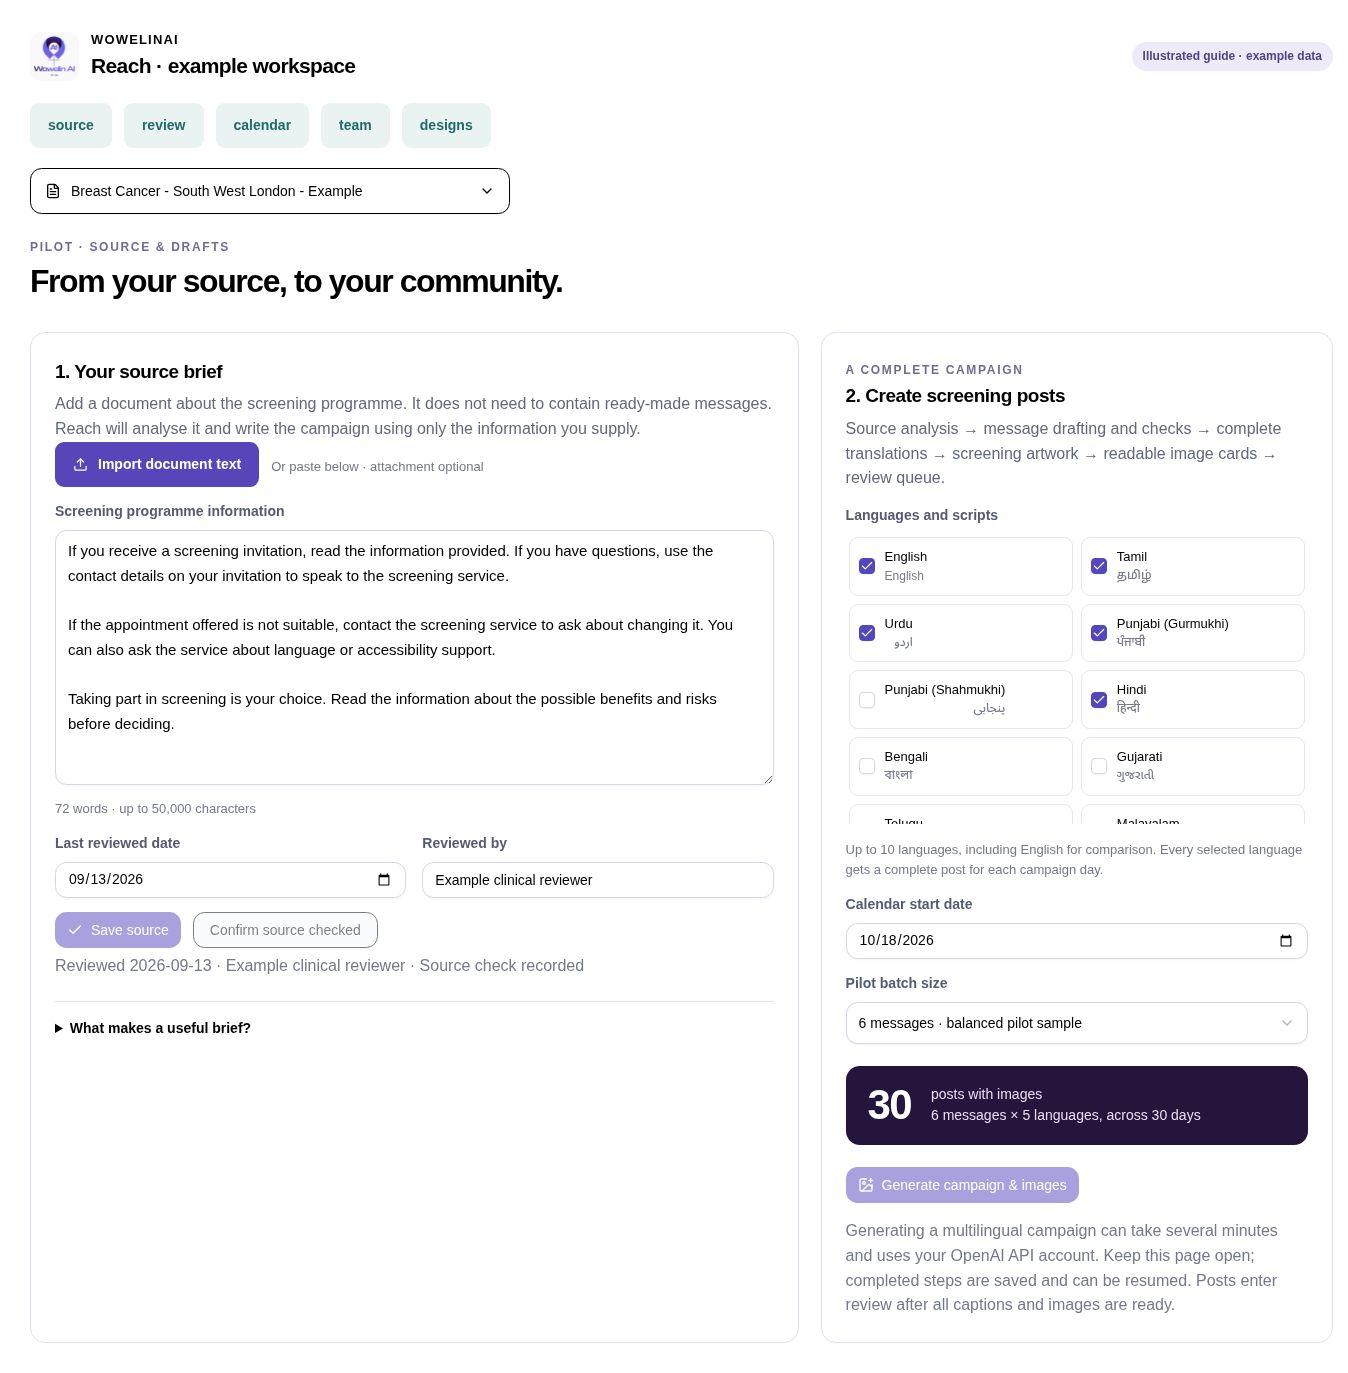
Keep the page open during generation. Progress saves as it goes. If it pauses, use Resume. Missing facts or service details must be added to the source; Glossavia should not invent them. Changing a saved source archives its previous posts.
Open a compact post in the language queue. Check the complete caption and image together.
1Check every part. In Message & source, compare the caption, call to action, image headline and accessible image description with the English wording. Expand the supporting source evidence. Save any wording changes.
2Pick a layout. Open Image and choose Post design: Clean headline, Photo first, Side-by-side or Indigo headline. New message groups rotate designs automatically. Keep the headline short and inviting.
3Save the complete image. Regenerate or upload artwork if needed, then select Rebuild complete image. Check the saved card for legibility, appropriate cropping and accurate image description. Changes reopen affected checks.
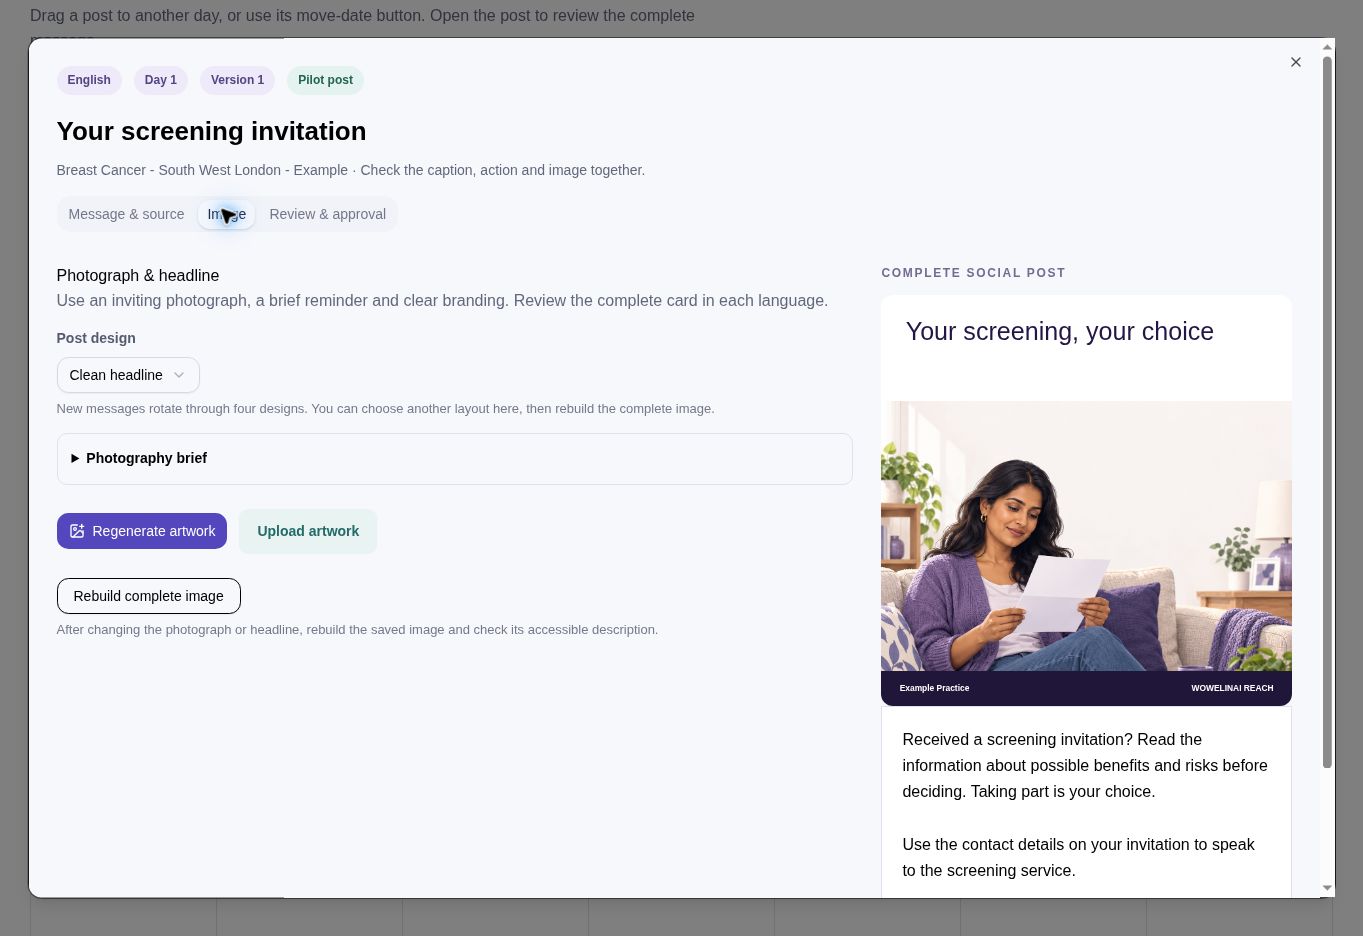
Previously saved images keep their original appearance until you rebuild them. Rebuilding an existing card removes the old decorative line and applies its selected design.
The pilot uses one review tab. The full program keeps its content checks without pilot scoring.
1Open Review & approval. Your name and the date are recorded when you save. No manual review timer is required.
2Complete four scores. Assess source accuracy, language accuracy, clarity and informed choice, and image accuracy and legibility. Select the highest issue severity. Use one issue-and-correction note when a problem is found.
3Confirm and finish. You can save an evaluation while work is in progress. When you finish, check I have checked the complete saved post within my assigned role. The box visibly ticks and saves the evaluation and your role’s approval, then returns to the queue and reduces its remaining count. For clinical reviewers and administrators, this also records the source check. If a score or saved image is missing, the tick remains visible while you finish those items; select Save review & return to queue when ready. A tick alone is not a saved approval. Find the saved post under Completed reviews. Pilot & evaluation shows language progress, named reviewers and unresolved findings.
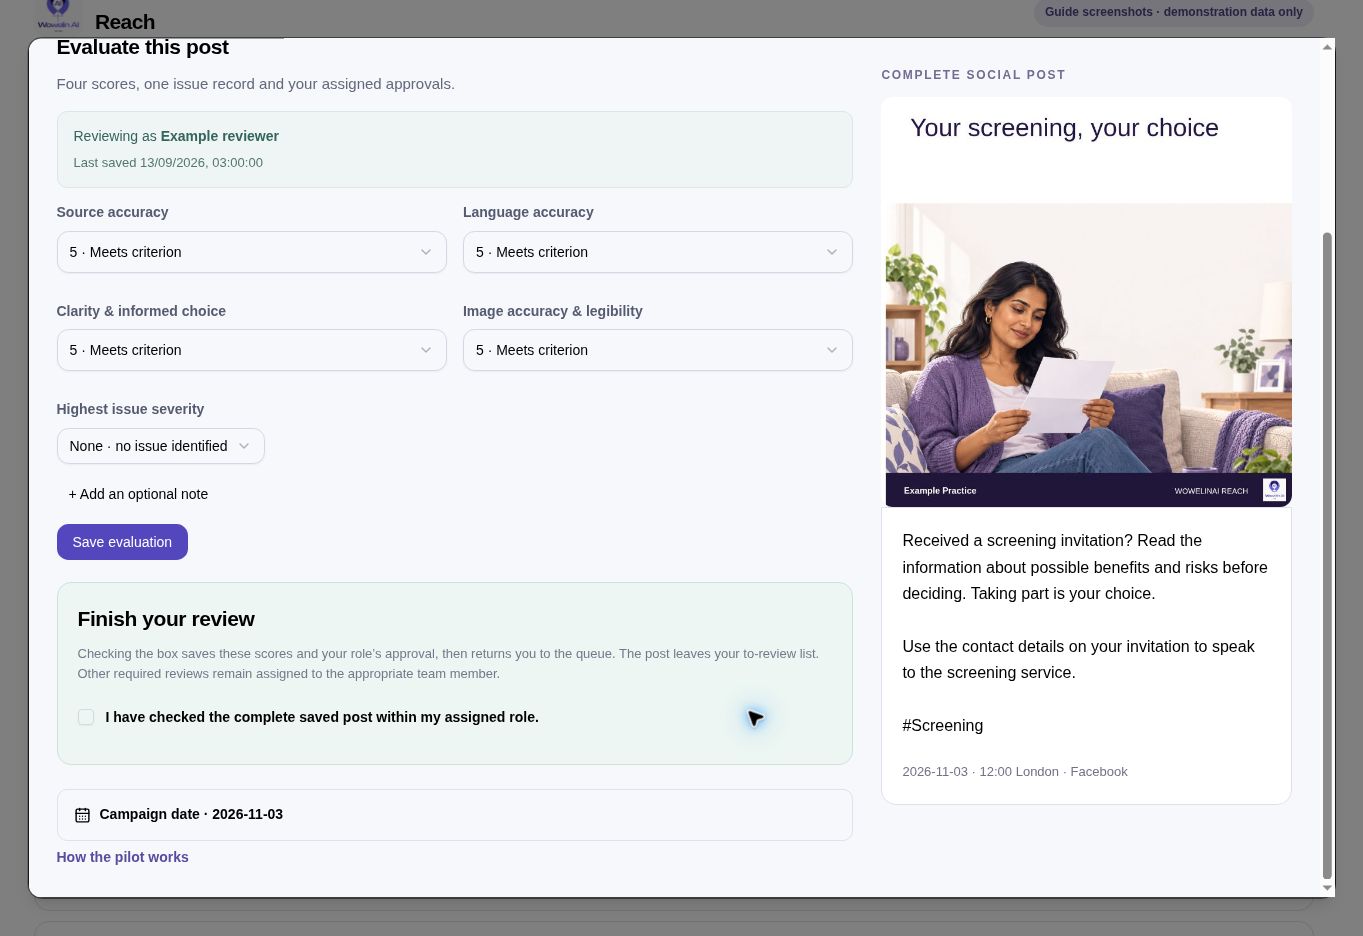
The proposed main pilot is 300 complete posts: ten briefs × six messages × five languages. Keep the initial 30-post feasibility run and other exploratory batches separate. Read the pilot process and decision criteria.
Drag posts between days, or choose a new date with the small calendar button.
1Move a post. In Campaign calendar, drag a post to the day you want. Its planned date saves in Glossavia. Each language version moves separately.
2Use the date picker. Select the small calendar icon on a post to move it by keyboard, on a phone or into another month. Choose the date and select Save new date.
3Preview the plan. Hover over a post, or focus it with the keyboard, to see its image and caption without opening it. Press Escape to close the preview. Use the month arrows and Export plan to share a calendar. Dates use 12:00 Europe/London. Pilot dates are simulated; a changed date reopens final pilot approval.
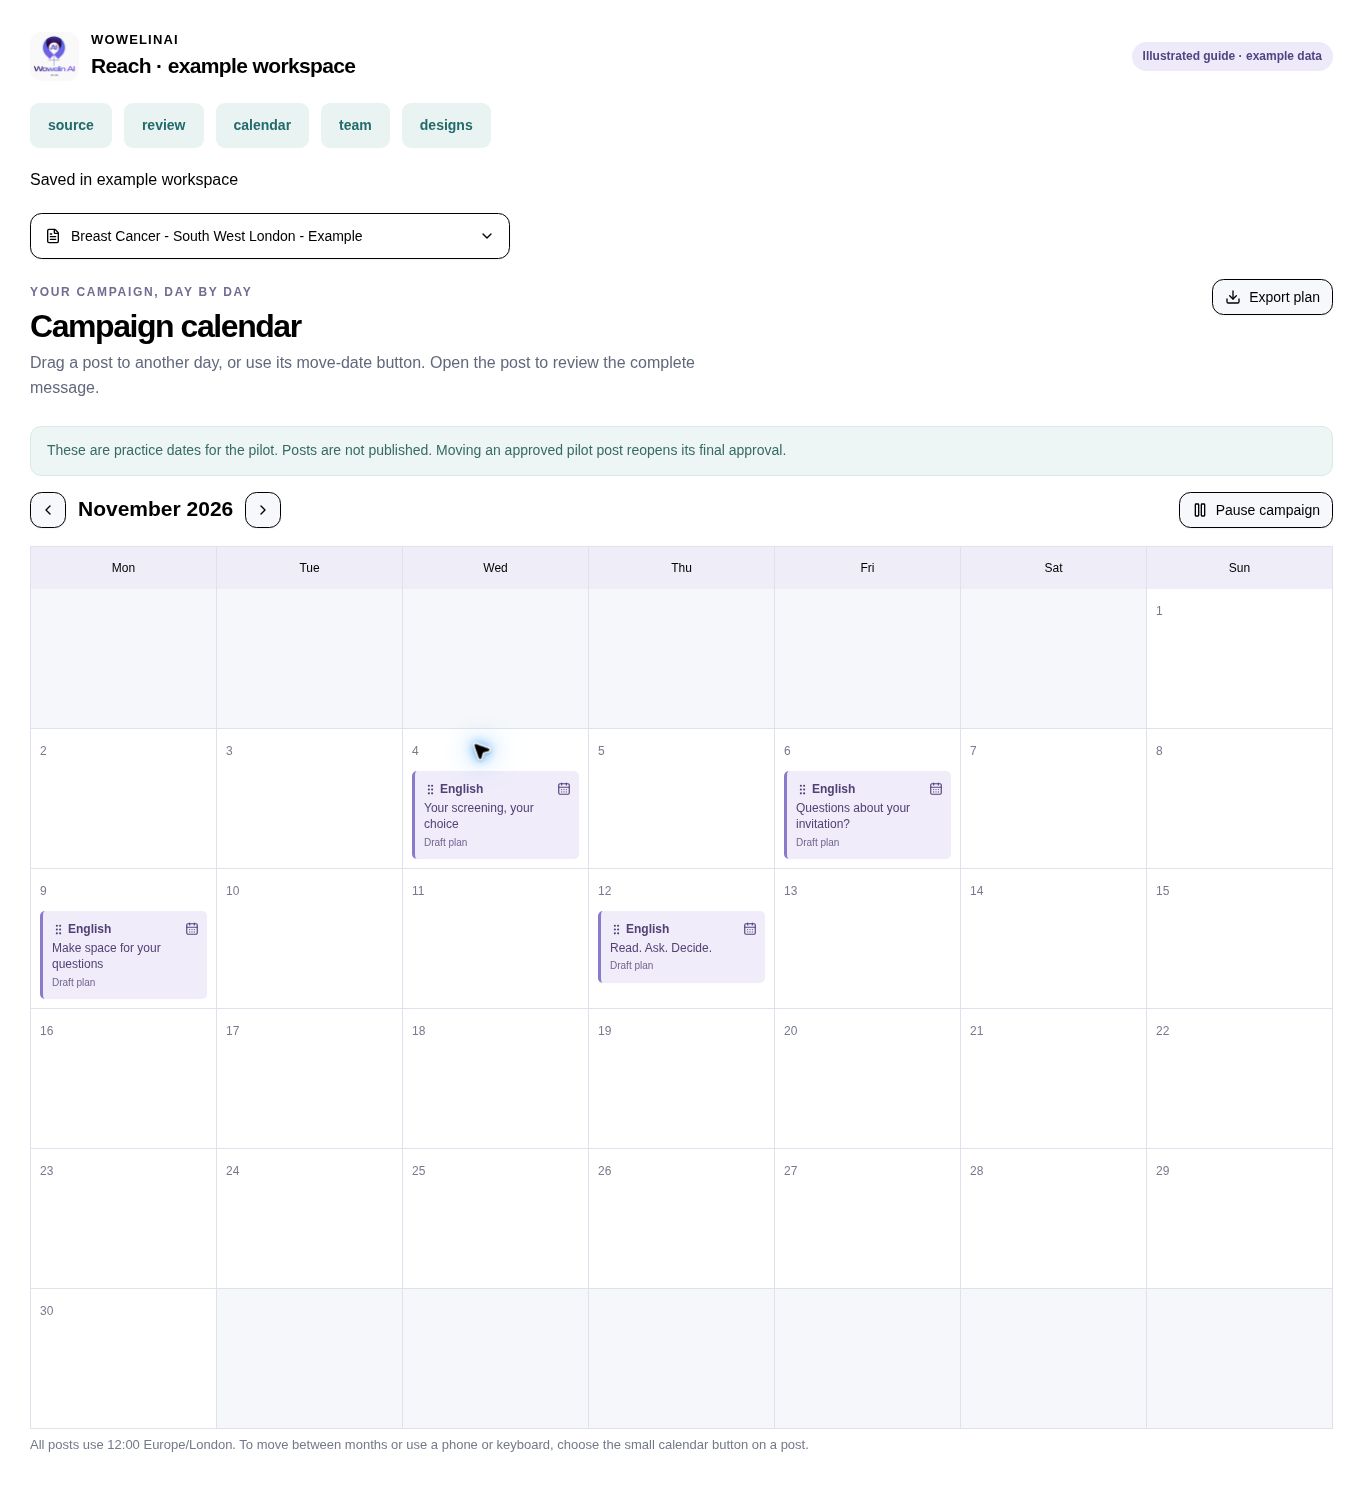
In the full program, moving a Glossavia date does not itself send a post. Open the checked post to schedule Facebook delivery. A post already scheduled or published on Facebook is locked; cancel or remove that delivery before changing it. “Scheduled on Facebook” confirms accepted delivery.
Use Administration in the full program, or Team & accounts in the pilot.
1Add their identity. Enter the person’s full name and the email where they can receive an invitation. They will sign in with this email and their own Glossavia password.
2Assign their responsibility. Choose Administrator, Campaign creator, Clinical reviewer / final approver, Language reviewer or Pilot evaluator. Language reviewers also need their assigned languages. Administrators manage both programs.
3Save and welcome them. Choose program access and select Create account & email invitation. The confirmation tells you whether the email was sent. The user selects Create your password in the email, sets their password and signs in. You can edit their name and access, or resend a password invitation from Team access. Changing permissions keeps their existing password. Removing a member also revokes their login sessions.
Welcome emails need a configured email service and a verified sending domain. A saved account can exist even if its invitation email fails. Use Resend password invitation, or ask the user to request a new link on the sign-in page. The owner account is protected, and administrators cannot remove their own access.
Start with current English information about your screening programme. Import a document or paste the relevant material into Screening programme information. Glossavia uses this to create campaign posts; you do not need to turn it into social media copy first.
Use the exact eligibility and invitation arrangements from your checked information. Distinguish a general cancer overview from information about an available screening programme. Do not assume that facts about a cancer explain who can receive screening.
Supply the relevant explanation of the test, possible benefits and limitations, and the information people need to make their own choice. Glossavia can adapt the wording but needs the underlying facts in the brief. Keep dates, figures and eligibility details current.
Tell Glossavia what someone can do: read a named information page, contact the service or follow their invitation. Supply the correct telephone number, service name and phone-friendly HTML link where available. Include booking or rescheduling instructions only where they are confirmed in your source.
Include confirmed language support, accessibility arrangements, transport or appointment support and how to ask for it. Avoid promising services that have not been agreed. Choose languages and scripts in the campaign controls; they do not need to be written as finished translations in your brief.
You can identify the topics to cover, the tone and any imagery that should be included or avoided. Glossavia creates short image headlines, inclusive artwork, captions, calls to action and accessible descriptions. The brief should provide facts; it does not need to contain ready-made posts.
Retain the source title, issuing organisation and version or publication date in the pasted text where useful. Enter Last reviewed date and Reviewed by below the box. Check imported PDF or Word text for missing words or broken tables. Use programme information, not patient names, records or identifiable appointment details.
Replace each bracket with checked information. Remove any heading that is not relevant; do not leave placeholders in the source you submit.
Programme and area: [name and area]
Audience: [confirmed eligibility and invitation arrangements]
Source: [title, issuing organisation and date]
Key facts: [checked information and balanced explanation]
Practical action: [what to do, how to book or change an appointment if applicable]
Service contact and information page: [exact phone number and HTML URL]
Available support: [confirmed arrangements and how to ask]
Campaign focus and imagery: [priority topics and relevant preferences]
Keep contact details and links inside the saved brief when you want them used in posts. Language choices, batch size and dates are set in the campaign controls. Replacing a saved source archives its earlier posts, so make any factual corrections before generating the final campaign.
Work through these with the practice lead. Start with one audience and campaign, confirm how the team will work together, and verify the complete workflow before expanding.
Identify who owns the campaign, approves its content, manages social accounts and responds to questions. Define the audience, screening programme and purpose. Update the organisation name in Administration so the correct identity appears on images.
Use current, approved information and record who reviewed it and when. Include the service details and accessible information links you want posts to use. Assign clinical and competent language reviewers, including the appropriate script, and confirm arrangements for interpreting or translation support.
Decide the sample, score definitions, error severity, independent checks and pass criteria before the main run. Use the 30-post feasibility stage to repair the process. Review results by language and retain original findings. Completing a target number of posts alone does not establish validity or clinical effectiveness.
Read the proposed pilot protocolAssign only the permissions people need. Agree what is uploaded, where it is processed, access review, retention, deletion, incident reporting and support. Use programme information rather than patient records. Complete the organisation’s applicable governance, security, accessibility and clinical-safety review.
An administrator configures the supported services in Connections. Check AI text and image generation with a small batch. For welcome and support emails, configure Resend with its API key and a sender on a domain your organisation controls and has verified. Confirm receipt of a test welcome email. Configure Meta for the full program; ElevenLabs is optional.
Connect an organisation-owned Facebook Page and confirm the required permissions. Use an agreed test post to verify scheduling, status checks and cancellation. Then release a small reviewed campaign. Monitor errors, engagement, accessibility and staff workload; study any change in screening attendance separately with suitable data and permissions.
Keep the campaign and its saved source. Read the reason shown, then use Resume if offered. If Glossavia asks for missing information, revise the brief with checked details. Changing the source archives the previous drafts. If the error repeats, use Support and include the campaign name and error message.
The saved image is a separate file. Save the text or design change, open Image and select Rebuild complete image. Check the new card and renew the affected approvals.
The account and email delivery are separate. Check the email result, ask your administrator to check the email connection and verified sender, then use Resend password invitation (or Send welcome again for an active account). A Gmail address cannot be verified as your sending domain in Resend. The sending domain must be one your organisation controls. Resend domain setup guide.
Only creators and administrators can move dates. Wait for any current save to finish. A Facebook delivery that is scheduled, publishing, published or awaiting confirmation must be resolved before its message group can change. Use the small calendar button if dragging is awkward on your device.
Glossavia uses concise, factual, supportive and non-coercive wording, adapted from the Screening text message principles. Source checks and human review remain part of the workflow. Individual appointment reminder timings are not applied to public social calendars.